Showing posts with label Non-Vinyl Crafts. Show all posts

Thursday, December 23, 2010

make Curtains from a dropcloth

Hey Ya'll! 

I recently got the urge to re-do the living room I'd previously spent days decorating. Remember the tree trunk? That was part of it.  Another part was to get new curtains for the opposite wall.  


The curtains had been striped with different colors, which was just too much crazy color for the room. I wanted things to look more neutral and soft, so my sister suggested I try curtains that would blend to the wall, instead. 

If you are have been in the blog-o-sphere for a while, you've probably seen drop-cloth curtains before, but I wanted to do something different.  I love the decorative, full look of these draw-up curtains, and they were so easy to make! 

Materials:
  • 1 drop cloth ($20 @ Ace Hardware for 8' x 12')
  • Hot Glue gun
  • Ribbon
  • Ironing Board
Directions:
1. Drape the drop cloth across the ironing board, and fold over one end for a hem

2. Hot glue the hem down. (All four sides of a drop cloth are hemmed, thank goodness! And it is a great material for hot gluing) 


3. Hang up the curtain!

4. Cut three (or however many you need) lengths of ribbon 2' long, and glue the center of each ribbon to the desired spot on the hung curtain.


5. Roll up the curtain and tie in a bow to enjoy the sun!

How easy was that? It took all of 10 mins. while I watched TV, and adds just the cozy, decorative look I wanted! I love them. 


Thursday, December 16, 2010

How to Turn a Tree Trunk into a table


I saw this great idea on the Nate Berkus show a few weeks ago, and filed it away in the back of my mind. In the meantime I've been scouring antique stores and flea markets for new endtables for our living room.  Um... lightbulb! Why not dust off that tree trunk idea? It is unique, brings some nature to your room, is unique, and inexpensive! All things that I L.O.V.E. 


But it did take some effort to track down...


After calling several lumberyards I was finally given the number for a local sawmill that carries raw logs. I went there to pick out my custom log yesterday afternoon: 

Imagine a large yard covered with tree logs, with an extensive (and loud!) carving station at one end and a single-wide trailer at another.

Me: "Hello....?"
Them: "Yes?"
Me: "Hi... I talked to Ben this morning about cutting a section of log for a table, and he suggested I come in to take a look." 
Them: "Ok. We don't normally do that sort of thing, but if you already talked to Ben you can talk to him now.  He's just out front on the forklift." 
Me: Concerned look. 
Them: "It's ok, the lift isn't running. It's safe to go talk to him." 
Me: What's a forklift?!!?!?


I was lucky to track down a great guy, Ben, who was willing to go out of his way to show me around and help me accomplish the crazy idea. 

I chose Maple. Ben explained that maple has a great inner design, wouldn't smell up the house, and grew thick enough for a good size table. 

Then he grabbed a .... something or other machine.... to pick out the log we chose.  

He suggested this log because it has a very unique, architectural design at the base.  I had expected getting something smaller, but I love the base design on this log so much!

Ben cut my log to the desired 19" with a chainsaw
He suggested cutting an extra inch so that there would be enough room to sand down any rough edges later. I thought that was a great point! 

My log!

I asked him how much it would be and he shrugged and said... "How 'bout $10?" 

This thing was massive! My husband guesses it weighs about 300 lbs., and it wouldn't fit in my trunk! So Ben and another employee carried it to my front seat, then suggested I fill up that tire with air to compensate :) 
I laid a protective hand over this log while driving, as if it was a precious child! 

At home, husband and I rolled the log out of my car and into our house. I put down a rug pad I'd bought, and then decorated it!
After a month or so the trunk, now green, will dry out and crack.  The bark will fall off, and we'll buff it up,  add polish, and a glass top to make it really beautiful.  For now it works as-is!


Husband grumbled a little bit at the strain of putting it up, and cracked some jokes about having a log in the house, but quieted up and applauded my genius after seeing online that log tables can sell for up to $1200 to $1600! 

Go Suz!


*UPDATE* My husband called me from work this morning just after I woke up.  His ringtone is a motorcycle humming, and at that moment I couldn't figure out what the noise was! I was actually thinking an electronic was broken, or someone was in our house. I laughed about it to him, and he suggested, "Maybe someone was in to cut down our log!" Har-de-har-har. 


Monday, November 29, 2010

Antique Ironing board turned to fantastic table

Years ago I saw a decorating show that used a technique of decoupaging book pages to transform and personalize bedroom furniture. I L.O.V.E. that idea because I love to read, and waited for years until I had my own home and furniture to decorate. 


When we moved into our first home, I decided I wanted our living room to be casual, but our dining room to be... special. The dining room has large glass doors to the patio on one side, a built-in bookshelf covering another wall, a widow to the kitchen on the third wall, and a completely empty fourth wall. 

So what to do with that empty fourth wall to make the room homey and special? 

I, fortunately, live in antiques heaven and scoured tons of local antiques stores searching for unique and up-cycle-able items for our home. I literally (Ben: "You said 'literally' so it must be true") screamed when I saw this antique ironing board folded up against a wall of one! I had instant inspiration that it would be a P.E.R.F.E.C.T. table for that wall-- tall, architectural, and shallow. 

I bought that wooden, antique ironing board for a mere $18. Can you say S.T.E.A.L.?

Materials
  • Ironing Board, or another wooden piece of furniture
  • An old book 
  • Glue
  • Foam paintbrush
Directions

1. Tear the pages out of the book, and rip them into differently-shaped pieces. Keep the pieces big, though, so there is less glueing to do to cover the furniture surface. Then use the book cover for a new secret compartment book! 

2. Brush a thin layer of glue on the surface. Add a book page and another layer of glue over top of the book page. 


I originally used spray glue. Don't make that mistake. I covered the area with newspaper, but the glue still sprayed E.V.E.R.Y.W.H.E.R.E. and I had newspaper stuck to me for a week. 

3. Be sure to layer your book pages in unique, textural ways so the finished look is interesting. 


 4. Review your piece and use the paint brush to smooth out any air bubbles or to add extra glue to areas that aren't sticking as well. 


I admit this project took a lot of time, but I am so thrilled with how I did it and the final product. I added a clothesline to the top of the wall with some honeymoon pictures attached with clothespins to continue the laundry theme. I just L.O.V.E. the way it turned out, and have made two more pieces of furniture (nightstands) because I loved that technique so much! 


yay. 


Saturday, November 27, 2010

Awesome earring holder from a picture frame


One of my new sisters-in-law has a birthday this week, and I had a ton of fun making a gift for her! She is very stylish, so I wanted to make something accessory-ish for her. I saw the idea for making an earring holder from a picture frame from Kari at Handmade Mommy a while ago, and knew this was the perfect thing for Sarah! (At least I hope it was.)

Materials:


  • Picture Frame ( I like the 4 x 6)
  • Fabric
  • Ribbon
  • Scissors
  • Clear Tape
Directions

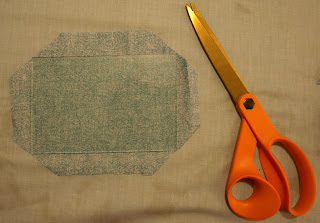
1. Cut out fabric about 1" extra than the glass from the picture frame, and cut the edge off. 


2. Tape each side of the fabric to the glass using the clear tape. 


3. Cut ribbon twice the width of the glass

4. Tie two knots in the ribbon about 1.5" apart


5. Tape each end of the ribbon to the back of the glass, about 1/3 down from the top of the glass. 


6. Attach the glass back to the picture frame


Oila! Doesn't that look great?! 

I pored over which fabric, colors, frame, etc. to use for her gift because even Sarah's house is F.A.B.U.L.O.U.S., and I knew the only way she'd like it or use it is if it matches, so I constantly looked at pictures of her bathroom, hoping for a match! 

But, I have to say, I L.O.V.E. how it turned out! How could she NOT like it?! The knots create texture for the earrings to hang from, and I added a pair of earrings I made for an extra touch. 

Simple and fun to make, functional, and beautiful... This may become my new go-to gift. 


Tuesday, November 23, 2010

Fudge-y chocolate no-bake cookies

Listen, I know everyone loves their Peanut Butter No-Bake Cookies, but I didn't have any peanut butter around and I needed to make cookies asap....

Frantic (yes, some people get frantic when making cookies), I used chocolate chips instead of peanut butter, and these cookies turned out to be A.M.A.Z.I.N.G. Just give them a try!


Ingredients:
  • 1 cup white sugar
  • 1 cup brown sugar
  • 1 stick of butter (I used soy butter, and they turned out just like normal with 1/2 the calories)
  • 1/2 cup of milk (I used soy milk, and couldn't tell a difference.)
  • pinch of salt
  • 1 cup chocolate chip
  • 1 tsp. vanilla
  • 3 cups rolled oats
Directions:
  1. In a saucepan, combine sugars, butter, milk, and salt. 
  2. Stir and bring to a boil (med. heat... you don't want to burn the sugar) for 1 minute
  3. Remove from heat
  4. Add chocolate chips and vanilla
  5. Stir until smooth
  6. Return to heat, add rolled oats 
  7. Remove from heat and cool slightly (don't allow to cool completely, or the sugar will harden before you're ready for it!)
  8. Drop by spoonfuls onto wax paper (or tin foil sprayed with non-stick spray if you don't have wax paper, as I had to do)

The result is beautiful, chocolatey goodness. These cookies have a fudge-like consistency, which tastes just amazing! Both a cookies and candy, you can't go wrong.


Don't be afraid to add some variation to an old favorite recipe... it might become a NEW favorite recipe! This is how I've discovered most of the foods I love, only problem is that I rarely have a recipe to follow or give out :)


Sunday, November 21, 2010

2-step Glass Jar Decoration

3 Pieces.... 
2 Steps.... 
1 Beautiful decoration.

A woman at our church taught a group of women how to make this very simple, very elegant, very inexpensive decoration, and I have to admit I was a little jealous that it wasn't my fantastic idea, but hey, it happens! At least I get to share it with you :)


Materials

  • 1 glass candlestick holder ($1 Dollar Store)
  • 1 large glass container ($1 Dollar Store)
  • E-6000 glue ($6/ entire tube craft store)
  • Embellishments
Directions:

1. Using the glue, glue a thick layer to the top edge of the candlestick holder


2. Attach the bottom of the large glass container to the candlestick holder

3. Fill the large container with chosen decorations


It doesn't get more simple or more elegant than that! And for only around $2.5?!??!?!
 And it has so many functions...

More uses: 
- Fill with water and fake flowers (will float) for spring 
- Fill with fake fruit for summer
- Fill with layers of colored beans for fall
- Fill with beautiful Christmas balls for winter
- Add candy for a birthday party 
- Add a thick candle and give as a gift 

Have fun! 


Saturday, November 20, 2010

Post-It Note Holder

Hey Hey Hey!!!!
(That's me being really excited to share this idea with you.)


How many people in your life do you have to make presents for this year? Teachers? Church leaders? Neighbors? You can't be expected to buy all those gifts! 

Here is a really F.U.N. idea for a gift that you can make for any of those random... er, special people in yours or  your kid's life. 

Materials:


  • Decorative Paper
  • Scissors
  • 3.5 x 5 plastic photo frame                                                                                                                                                  (the kind with the stand attached)
  • Embellishments                                                                                                                                                  (I'm using ribbon and hang tags)
  • Post-it Note stack pulled into 1/2 or 1/3                                                                                                            (each section will go on it's own frame, so you can use 1 pad for multiple gifts)
Directions

1. Cut paper to fit the size of your frame


2. Insert the paper to photo frame 
            Add a piece of decorative paper to th back, also, for a finished look.


3. Add embellishments to the top of the frame
            The stand should be at the top of the photo frame. 


4. Add a section of post-it notes to the middle of the frame


Now you have a really cute post-it note holder that anyone would love to have. 


Photo frame: $1 Wal-Mart
Scrapbook Paper: $.60 (full sheet) Hobby Lobby
Ribbon: $1 (full spool) Hobby Lobby

Happy crafting!


Wednesday, November 17, 2010

Rosette Barrettes-- My first attempt

I L.O.V.E. the things people are doing with crafted rosettes now; chunk necklaces, t-shirt embellishments, headbands, purses, etc. I think it is such a cute, unique way to personalize something that could have been... well, B.O.R.I.N.G.

Just one issue... As much as I love the look, and as easy as it's said to be, I've never tried making rosettes before! I usually leave that to my awesomely crafty sister, but she lives too far away now for me to rely on her for my every need. Time to grow up.

So I found this tutorial on making rosettes into all sorts of fun things, and decided to bring along some materials to make this small craft at my hotel room (that's dedication. Don't you think?)

I actually got my hot-glue gun through TSA, but didn't attempt some scissors. Step 1: Make friends with the people at the check-in desk!

Materials:


  • Chosen fabric
  • Scissors
  • Hot-glue gun
  • Hair clips
Directions:

1. Cut fabric into strips. The wider and longer the strips the thicker the rosette will be


2. Tie a knot into one end of the strip


3. Wrap the loose end of the strip around the knot, folding in the extra material after the knot. Twist the strip randomly to create variety and volume. 

4. Dot hot glue every turn or so to keep the rosette in place
       You could also sew thread through the rosette to keep it in place, but I couldn't bring a needle in my carry-on!


5. Glue the hair clip end to the finished rosette


6. Admire your finished work!


Oh so cute... so G.L.A.D. I finally learned to do this! I'm going to start rosette-ing everything!


*UPDATE: I loved these hair barrettes so much I changed my outfit to match them and kept two in my hair.  My husband came back to the hotel after his meetings that day and, while giving me my hello kiss, stopped and said, "Are those new?" Love it!